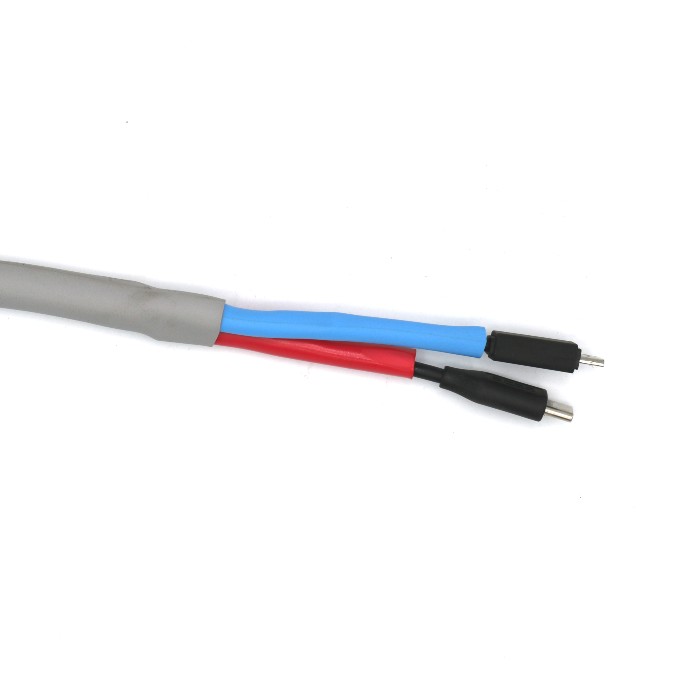
Y Transitions - Heat Shrinkable Tubing
How To Make A Y-Transition With Heat Shrink
We've all been there. Eagerly unboxing that brand new device, ready to install a shiny, new piece of equipment, and totally geared up to revolutionize how you work, play, and go about your day.
And then it happens. Multiple devices, mixing signals, and minimal ports snap you back to reality. Don't let running power and interference send you running back to the store.
Learn how to make a Y-cable splitter at home to save yourself time, money, and hassle, and bring back the joy to your cable management.
What You Need To Know
Whether you're setting up a home theater, hooking up an incredible sound system, or trying to reroute some of those cluttered cables, making your own y-transition cable breakout is an easy and cost-effective cable management solution. Plus, you can do it yourself with just a couple of common materials and a few easy steps.
From ethernet and coaxial cables to CAT cords, fiber optics, and extension cords, your TV, internet, modems, routers, subwoofers, and gaming systems all need to be connected. So when your AV, VGA, RCA, and HDMI connections are making you lose a clear picture, that deep bass line, and your mind, here's how y-transitions can help you get back on track.
Y-transitions are:- Y-shaped to accommodate cable splits, entry/exit points, and junctions
- Super convenient because they allow for customization wherever you need it
- Safe and effective ways to add insulation, strain relief, and abrasion protection
- Useful for reducing signal noise and distortion
- More durable than electrical tape alone
- Faster and easier to install than conduits or cable trays
- Less expensive than custom cable glands or custom molded rubber boots
- A simple, cost-effective solution you can make yourself
Making your own y transitions is helpful when you're working with cable harnesses and cable assemblies. They're also a great way to protect USB C and Apple lightning cables, and they can be made with whatever color, size, and type of heat shrink that your specific application requires.
What You Need To Have
In this easy, 4-step tutorial, we're using general purpose 2:1 polyolefin heat shrink tubing and our ultra-clear heat shrink tubing.
You can use any kind of heat shrink that works best for you, though. You'll also need scissors and a heat source, which can be as convenient as a pocket-sized butane lighter or as versatile as a heat gun (like our portable, powerful, precise, and price-conscious VT1100).
Here's the exact breakdown of the materials and wires used in this tutorial:- Wire #1: USB Plug 3/8" x 1/4" (1/8" OD wire). This is the lower one in all the pictures below
- Wire #2 USB Plug 7/16" x 1/4" (3/32" OD wire). This is the upper one in all the pictures below
- 1/2" ID 2:1 Polyolefin Orange Heat Shrink
- 1/2" ID 2:1 Polyolefin White Heat Shrink
- 5/16" ID 2:1 Shiny Clear Heat Shrink Tubing
- VT-1100 Heat Gun
What You Need To Do
Grab your materials and follow along with us to discover just how easy this cable management solution is to do yourself.
STEP 1
Select the appropriate size heat shrink.
Since most plugs, ends, and connectors are wider than their cords, you'll have to choose a tubing diameter that fits over your specific cord. We picked a 2:1 shrink ratio, but for a snugger final fit, we also could have used a 3:1.
The wider the adaptor, the higher the shrink ratio you will need.
STEP 2
Cut a V-shaped hole in heat shrink going on your upper wire. It's red in our tutorial. Slide it over your upper wire and then thread your lower cable through the hole you just made.

STEP 3
Cover your lower wire with its chosen heat shrink. We used our speciality, ultra-clear heat shrink for sturdy protection and superior visibility.

STEP 4
Pull the lower wire back so that the heat shrink covering (it's clear in our tutorial) is sitting inside the hole you made in Step 1.

STEP 5
Apply heat evenly and to all sides of the heat shrink in your project. Check out our helpful how-to videos for tips and tricks for properly heating heat shrink with a butane lighter or a heat gun.

Step 6 (optional)
For a better-looking and better-protected final product use another piece of heat shrink to cover and seal the split, as seen below.


What You Need To Remember
It's easy to make your own y-shaped transitions at home.
When you have multiple devices, mixing signals, and minimal ports, using y transitions is a fast, easy, and effective way to manage your cables while also providing insulation, strain relief, mechanical protection, and an environmental seal.
Here are a few exclusive, behind-the-scenes tips for choosing the best type of shrink for your y transition.- For quick, effective protection against daily wear and tear that locks out dirt, debris, and moisture use any option of brightly colored, general-purpose polyolefin heat shrink.
- For more durable seals and heartier mechanical protection that won't fade or melt in the heat or UV rays of the sun choose black heat shrink.
- For the strongest seals, toughest shields, and absolute best protection against water, weather, wind, wear, and whatever else comes your way, upgrade your heat shrink to a dual wall, adhesive lined heat shrink. (Just make sure to upgrade your installation heat source to a heat gun, not a lighter.)
If you have any questions when you try this at home, drop in or drop us a line. We're always happy to help!
Y Shaped Heat Shrink

