How to Make a DIY Dog Leash with Heat Shrink Tubing

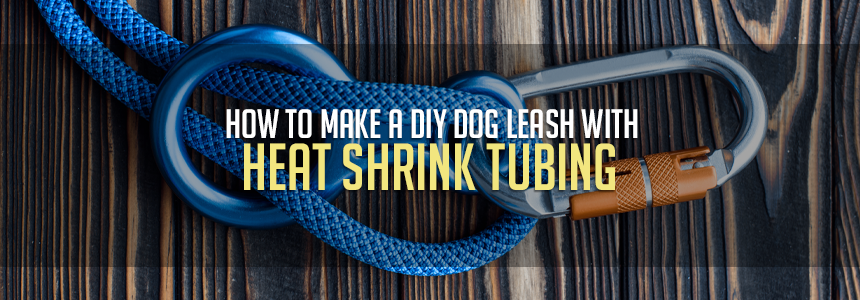
Heat shrink has a ton of different uses. Made of durable, long-lasting material, it's a low-cost, versatile, and effective solution. Aside from the typical wire and cable management use, it's also a convenient tool for home projects. This easy DIY dog leash is just one great example of how to use heat shrink in your daily life to create something special for you and your furry friend.
Gather some rope, heat shrink tubing, a heating method (such as a heat gun or butane lighter), and a carabiner (or snap hook).
Now you're ready to get started!
1. Cut the Rope
Start this simple DIY project by cutting your rope to the desired length. Measure out how long you want your leash to be, and then add around 1.5 feet for the clasp and 2-3 feet for the handle (depending on how large you want the loop to be).
We recommend using a strong cotton rope for a durable dog leash that won’t tear when your pup tugs. Once you cut your rope, either secure the ends and prevent fraying with pieces of heat shrink or burn the rope's ends. We recommend using a strong cotton rope for a durable dog leash that won’t tear when your pup tugs. Once you cut your rope, either secure the ends and prevent fraying with pieces of heat shrink or burn the rope's ends.
2. Tie a Knot
For the next step, you will need to create a compact knot for the clasp side of the leash. This video demonstrates how to tie a poacher's knot tightly to ensure your clasp won't slip off.
If you choose to use a snap hook, loop the rope through the clasp before tying the knot to secure it to your leash. Another option is to use a carabiner, which you can hook on after you’ve tied the knot.
3. Cut Heat Shrink
To secure the knot you’ve tied, cut two pieces of heat shrink (about 3 inches in length each), and thread them onto the rope from the untied side. Once both sides are knotted, you’ll use these pieces to secure the rope. For now, make sure that both heat shrink tubes are on the rope before you create the handle.
4. Secure the Heat Shrink
Now slide a heat shrink tube around the rope tied into a poacher's knot. This is where your heat source comes in - that heat gun or butane lighter! Make sure the heat shrink is covering the loose ends of the knot and melt your heat shrink around the rope to secure the clasp of the leash.
5. Create the Handle
With the untied side of the rope, create a loop for your wrist with your desired size. You can check through different sizings by securing the rope temporarily with some tape until you’ve found a loop size you’re happy with.
6. Secure the Handle
Once you’ve measured your desired handle size, slide one of the heat shrink pieces up to the handle and double-check that it covers both ends of the loop. Here's a tip: secure the handle with electrical tape and melt the heat shrink on top. Applying heat, melt the heat shrink around the rope to secure the handle. Once the heat shrink is fully secured, you’re good to go!
With the help of heat shrink, you’ve made your very own dog leash in just six simple steps! These leashes are perfect because you can customize them to any length and size for any sized dog.
Heat shrink ensures that your DIY leash will last a long time and provide enough strength to sustain all of that wear and tear from your pup. Visit our Learning Center for more step-by-step DIY projects and heat shrink tubing tricks!


About the Author

Types of Heat Shrink: What They Are, and What They’re For
September 9, 2020
How To Remove A Cable Tie
August 10, 2020

10 Types of Electrical Connections and How They’re Made
March 10, 2021

The Top 10 Do's and Don'ts of Heat Shrink
November 10, 2023
Heat Shrink Sizing Guide
September 29, 2020

How Heat Shrink and Mil-Spec Keep Systems Airworthy
July 2, 2026

A Man & His Garage: How to Get it Under Control
June 25, 2026
The Only 5 Products You’ll Need All Summer
June 11, 2026
How To Protect HVAC Wiring From Summer Strain
June 4, 2026