How To Make A Cable Snake

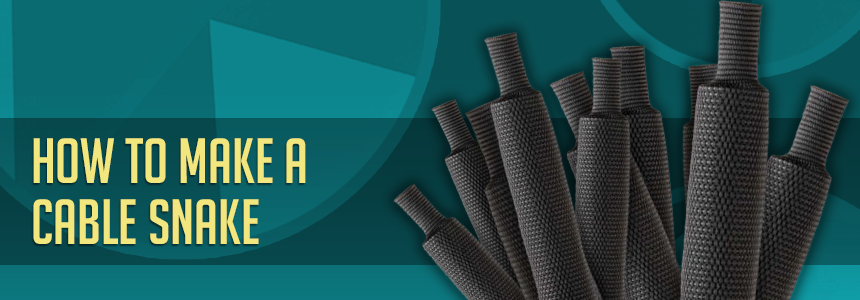
How To Make A Cable Snake
A Cable Snake, sometimes called a multicore cable or loom, is a group of cables held together by a sleeve or shield of some kind. It's essentially one big cable stuffed with any number of smaller wires or cables.
In a tech-savvy world, cable snakes are massive time and space savers. They're ridiculously convenient, and they make you look as good as they make your cables look. Plus, this DIY project takes less than an hour to complete and barely requires a trip to the store.
It's called a cable snake, and here's everything you need to know about how to make one.
Step 1: All Things Considered
The first step of any great DIY project is the planning phase. Making the perfect cable snake to organize your cables, wires, and cords is all about what works best for you and what your specific needs are.
If you're a producer, tech, musician, or artist, you're used to toting around wires, cables, cords, and connections on a daily (and gig-to-gig) basis. You don't have to be a professional to build or benefit from a cable snake though.
Is your home office starting to overflow? Maybe you're tired of tripping on or looking at the cables from that home entertainment system. Or perhaps the cord clutter under your desk needs some serious order. When it comes to snake cables, here are the things you'll need to consider during step one.
Your cables
Some popular manufacturers make prebuilt audio snake cables, but chances are they won't have exactly; only you'll know that. If you're just a hobbyist or home user, a prefab cable audio snake probably won't be the right match.
Every gig, venue, PA system, and stage is set up differently, but the equipment you need, use, and bring with you probably isn't. From instruments and effects to animations and controls, each piece you have is always mission-critical. Bringing your own personal gear with you to professional engagements can be stressful. It's easy for things to get lost in transit, mixed in with the house sound/system, bent, forgotten, or misplaced.
Imagine if every cable, cord, and wire you owned and needed was safely ensconced in a protective cover and securely wrapped up in a nice, neat, and orderly bundle. When it's time to go home, just unplug your snake cable, coil it up, and leave with what's yours.
Here are just a few ideas of the most common contents you can load into your DIY cable snakes:
- AC power
- RCA (red, yellow, white)
- VGA
- HDMI
- Firewire
- Fiber optics
- Coaxial
- Midis
- Midis via USB
- USB (all the types)
- Pedalboards
- Hubs
- Connectors
- Projectors
- Switches
- Hubs
- Nano controllers
- Boxes
- Laptops
- Amps
- Sound systems
That's a really long list of customization possible when you design and build your own cable snake. As you're taking inventory of what's actually going inside your cable snake, it's a good time to double-check all those wires and connectors. Look for flimsy, fraying, split, or splaying cable jackets, especially at the ends near their input/out. You still need the end of each cable within your snake to function properly, so while everything is still separated, it's the perfect time to secure and reinforce with some general purpose heat shrink.
Your products
The next part of the planning step is to consider what products you'll be using to build your cable snake. Making your own snake cable is faster than you think and they're incredibly cost-effective.
You'll need a durable, resilient, and tough outer layer. This will act as the "snake" and it's this shell into which you'll feed each of your smaller cables. It's also handy to have some zip ties, sharp scissors, and a heat source (like a small butane lighter) to use if you plan to reinforce any of your single wires before you fit them into a larger snake cable.
TechFlex F6 Woven Wrap 7 Step 2: All Your Ducks In A Row 100
This 2:1 woven material has excellent elastic flexibility. With its easy self-wrapping design and superior woven construction, F6 Woven Wrap has been designed to give superior protection and performance to today's modern wiring/harness industry. This wrap-around sleeving is made to encase smaller wires/bundles with extra overlapping seams to provide unbeatable coverage, increased abrasion resistance, and outstanding cut-through protection.
Heat Shrink Fabric 100
Fabric Heat Shrink has a 2:1 shrink ratio and is available in diameters as small as ⅜" and all the way up to 3.15". Made from a highly flexible fabric, its woven construction allows for quick installations. It also has an incredibly low shrink temperature making it the perfect addition overtop of heat-sensitive substrates and irregular substrates. Its tightly woven filaments are highly resistant to extreme temperatures from -40°C to 125°C and even the most severe environments. It stands strong against a wide variety of chemicals including gasses, oils, fuels, and fluids.
Step 2: All In The Same Boat
Now that you've considered the cables and products you'll be using, it's time to lay out exactly where they are going in your cable.
Having zip ties or velcro fasteners on hand during your cable snake construction is always going to make the process go a bit smoother. Some DIY-ers prefer to feed each wire in one at a time and then zip tie them at the end, but we recommend bundling things up here in step 2.
Starting with a couple of temporary fasteners gives you a lot more stability and freedom for your hands while you work. It also makes measuring for the exterior cable diameter a lot easier to do. This not only helps you buy the right size outer shell but also provides the safest and most stable protection for all the things traveling inside of it.
A general rule of thumb is that 2-3 interior cables need about ⅜", while 4-6 cables will sit better in diameters closer to 1 ½". Another helpful tip is to consider the length of your input side vs your output side. It might be more convenient to have longer lengths sticking out one end of your cable snake in case the stage is large or your connections are far apart.
Step 3: All In Through Thick or Thin
Whether your cable snake is 2 wires or 8, the third (and trickiest) part is getting everything fed into one end of your outer snake skin. Don't let the name throw you, we don't actually mean the skin of a snake. Although some woven fibrous braided sleeves do have patterns that resemble snakeskins, what we mean is the outermost layer of your snake cables. The F6 Woven Wrap from TechFlex doesn't actually look like a snake skin, but by the end of this step, it sure feels like one.
Start by feeding one end of your prebundled cables into your outer shell. It takes some finessing at the beginning because your connections are the widest part. If your outer layer is made from a wrap, it makes this step a lot quicker. Either way, it takes a lot of stretching, pulling, tugging, sliding, and manipulating to work the entire length of your snake cable "skin" all the way down and over the entire length of your group of cables.
Make sure to secure your cover in place at each end to prevent fraying. You can do this with electrical tape, but for the best protection and insulation try something a little more rugged like heat shrink tape. The better you secure your ends, the longer your cable snake will last. These are the weakest points because they are the most handled, the most important, and the most likely to get pulled on.
After you've secured both ends and removed your temporary fasteners, you're all set. It's that simple. Just pick your cords, pick a material to shield them, bundle them up, and send them through.
Step 4: All Systems Go
From entertainment systems to sound systems, offices to gigs, and desks to stages, we all know how annoying and dangerous loose cables can be when they're just lying around. They're eye sores, tripping hazards, and just a general nuisance all around.
Cable snakes are a quick, easy, DIY solution to take back control of your wiring.
Whether you're a professional, a hobbyist, or somewhere in between, making one is a low-cost, high-customization project that takes less than an hour but lasts for years.
Check out our entire range of braided sleeving products to explore even more possibilities for building your dream cable snake.


About the Author


Types of Heat Shrink: What They Are, and What They’re For
September 9, 2020
How To Remove A Cable Tie
August 10, 2020

10 Types of Electrical Connections and How They’re Made
March 10, 2021

The Top 10 Do's and Don'ts of Heat Shrink
November 10, 2023

Heat Shrink Sizing Guide
September 29, 2020
How To Fix A Broken Phone Charger Fast and Make It Last
July 23, 2026

How Heat Shrink and Mil-Spec Keep Systems Airworthy
July 2, 2026

A Man & His Garage: How to Get it Under Control
June 25, 2026

The Only 5 Products You’ll Need All Summer
June 11, 2026

How To Protect HVAC Wiring From Summer Strain
June 4, 2026